How to Make a Giant Ceremonial Key from Cardboard or Foam
- Posted by Ceremonial Key Editorial Team
- First published
- In Ceremonial Keys
To make a giant ceremonial key, draw a key shape to scale on paper, trace it onto cardboard or foam board, cut it out, add layers for the bow and bit, then finish it with paint or wrap. Pick a size one person can hold steadily, use the right cutting tool for the material, and follow the maker's instructions for knives and adhesives.

Part of the series: Ceremonial and Oversize Keys: Types, Materials and Uses
A cardboard or foam key is a cheap, quick way to get a key-shaped prop for a welcome, an opening or a stage reveal. This page, part of our ceremonial keys guide, walks through the build. For a real honor, the key to the city page explains the difference between a prop and an issued key.
Finding-aid note: the sources cited here were consulted on 2026-11-17 and set beside the statements above. The method is a build note, not a tested product recommendation; for tools, adhesives and paints, the manufacturer’s instructions and safety data sheet govern.
What you need
- Corrugated cardboard, foam board or thick craft foam
- Paper for a pattern, pencil, ruler or straightedge
- A cutting tool suited to the material, and a cutting mat or board
- Glue or tape suited to the material
- Paint, foil or wrap for the finish, and a clear coat if desired
- Ribbon, if you want a bow
No brands needed; read each product’s label for what it bonds and what it dissolves.
Choose a size and make a pattern
- Decide who will hold it and how long it must stand up in a picture.
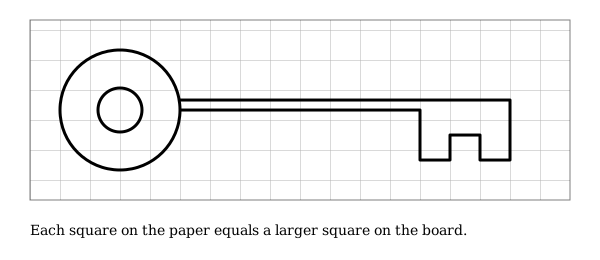
- Sketch the key on paper: a round or ornate bow, a straight shaft and a toothed bit. Keep the shaft wide enough that it does not flop.
- Draw it on a grid, then scale it up. Each square on the paper equals a larger square on the board.
- Cut the paper version first and hold it at arm’s length to check the look.
Cut, layer and shape the bow and bit
- Trace the pattern onto the board.
- Cut the outline with a fresh blade, using several light passes instead of one heavy cut, and always cut away from your body and on a mat.
- For strength, cut two or three identical pieces and glue them face to face, with the corrugations running in different directions for cardboard.
- Add a raised ring or border to the bow with strips for relief.
- Round sharp edges with light sanding or a smoothing pass.
Finishes: paint, foil or wrap
Seal the surface so paint does not soak in. Paint a base coat, then a metallic coat. Foil or metallic wrap gives a brighter look but shows dents. A clear coat helps hold the finish. Always test glue, spray paint and solvent-based products on a scrap: some dissolve foam.
Safe cutting and adhesives
Use the cutting tool the maker designed for the material, keep blades sharp and replace them, keep your free hand clear of the cutting line, and cut on a stable surface. Work in a ventilated space when using adhesives or spray products, and read the product’s safety data sheet for any warnings. We do not give numbers or ratings here because they come from the maker of each product.
Display or presentation tips
- Plan the route before moving a large key: check door widths and corners, as conservation handling guidance advises for large objects.
- Do not carry the key by its bow or ribbon; support it by the shaft or base.
- Add a hidden handle or stand at the back for the person who will hold it.
- Keep it dry and flat between uses.
- For the moment of handing over, see how a city presents a key, and for storing it later, display ideas.
If you want something that lasts, or the key is for a formal honor, compare it with other civic honors or a made metal key.
Troubleshooting
- The shaft bends. Add a stiffener: a strip of board glued down the back, or a third layer.
- Paint wrinkles the surface. Seal the board first and let each coat dry.
- Edges look rough. Trim with a fresh blade and sand lightly.
- Foam melts or pits. Test every paint, adhesive and solvent on a scrap first.
- The key is hard to hold. Add a hidden handle at the back, positioned near the balance point.
Making it presentable
Add a bow of ribbon at the bit’s base, choose a color that suits the venue, and add a small label card. For a photograph, hold the key at chest height with the bow toward the camera. After the event, take a photograph for the record and decide whether to store or discard it; flat storage in a dry place keeps it presentable.
Answers to common questions
How big should a giant key be?
Big enough to read at the distance of your audience, and light enough for the person holding it. A key that one person must hold up for a photograph should be balanced and comfortable, while a stage prop can be larger if it leans on a stand. Cut a paper version first and hold it before committing to cardboard or foam.
What is the easiest material?
Corrugated cardboard is the easiest and cheapest, and can be layered for strength. Foam board is lighter and cuts cleanly but dents. Thick craft foam holds paint well. Choose by how long it must last: cardboard for a one-day prop, foam board for something you want to look neat in several photographs.
Can I make a metal-look finish?
Yes. Paint with a metallic or gold-tone craft paint, or cover with foil or metallic wrap, smoothing it flat. Seal with a clear coat made for your base material. Test on a scrap first, because some paints and adhesives dissolve foam, and follow the maker's instructions for the product you use.
How do you attach a ribbon?
Punch or cut a small hole in the bow, reinforce the edge with tape or an extra layer, and thread the ribbon through. Tie a bow or loop. Do not hang the key's weight from the ribbon alone if you will carry it; support it by the shaft or base. A ribbon is for looks, and a handle at the back is for strength.
Is a printable template provided?
The grid method on this page works without one. Sketch a key with a round bow, a straight shaft and a toothed bit on squared paper, then scale each square up to the size you want on the board. Measure twice, cut a paper version first and check the proportions by eye before you cut the final material.
Further reading
Related reading
- Ceremonial and Oversize Keys: Types, Materials and Uses
What a ceremonial key is, how standard and oversize keys differ, which materials suit which uses, and how to handle, display and care for a ceremonial key.